Tips For Making The Perfect Cake - Get Superb Results Every Time
I have spent countless years baking cakes. I spent a lot of them frustrated at my many failed cake attempts. Or sometimes not even failed attempts, but not perfect either. From cracked tops, a dry crumbly texture, sunken middles, the list could go on and on. But with years of practice I can finally say I have perfected my cake recipe. I wanted to share it with you, along with some important tips and tricks!
- 230g unsalted butter
- 230g caster sugar
- 1tspn vanilla extract
- 4 large eggs
- 30ml milk
- 230g self raising flour
- small pinch baking powder
Whisk the butter, sugar and vanilla until pale and creamy. Whisk in the eggs. Add the milk and sieved dry ingredients using the flour-liquid method described below. Tap the cake on the counter. Divide between two 8inch tins and bake for 25 minutes.

There’s no order of significance here – all of these tips are important in their own way.
1: Be Precise When Measuring Your Ingredients
Baking a cake isn’t just chucking stuff in a bowl and mixing it – there’s a science behind it. That’s why it’s crucial to measure your ingredients with accuracy. I recommend a good set of digital scales (these ones are great). I’ve had mine for 7 years now and they’re still going strong!
2: Line Your Cake Tins With Greaseproof Paper
Sometimes you can get away with greasing it with butter. But to ensure your cake never sticks to the tin, first grease your tin with butter or oil. Then cut out circles of greaseproof paper and fit them into your tin, as well as strips to line the sides. Reusable cake tin liners are a great way to save on paper waste.
3. Make Sure You Use Softened Butter
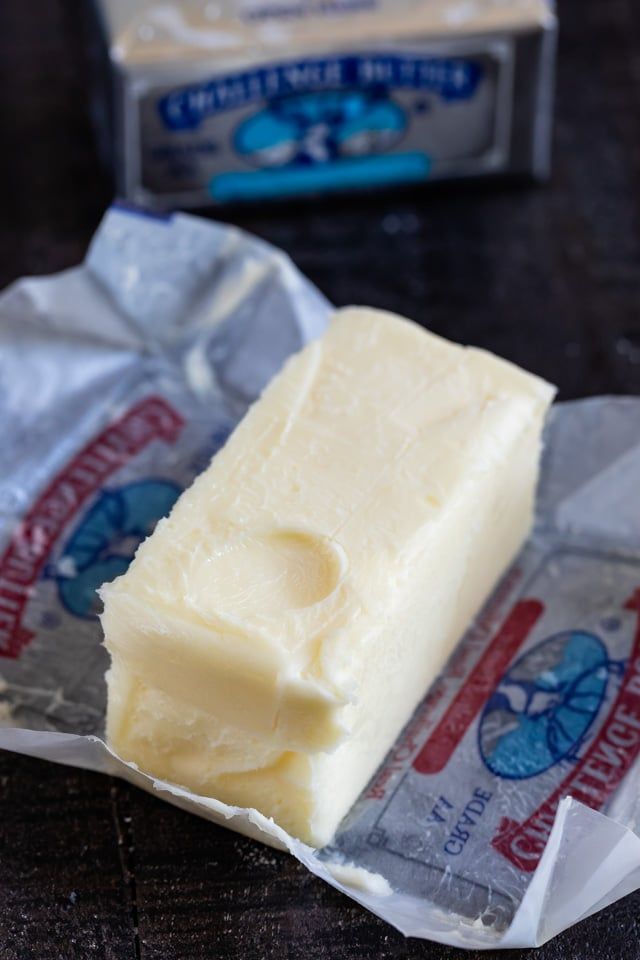
A good way to test if your butter is soft enough is if you can poke it and your finger goes in with little effort. If your butter is straight from the fridge, it wont whip up and capture as much air as room temperature butter. If your butter is too cold, warm it up in the microwave in 10 second intervals.
4. Use Room Temperature Eggs
Like butter, eggs whip up and become more airy when they are at room temperature. As well as this, your cake will take longer to cook if your eggs are cold. If you don’t have time much time, put your eggs in a bowl and heat them in the microwave for 5 seconds or so. This will bring them to room temperature in no time.
5. First Whisk, Then Fold
A whisk is great for whipping lots of air into the butter, sugar and eggs. But when it comes to adding in the flour, use a spatula and gently fold to avoid over working it.
6. Use Baking Powder & Self Raising Flour
Yes, I always use both. Self raising flour promotes a good well-rounded rise in a cake. But I find whenever I use self raising flour alone in my cake recipes, they wouldn’t have the height I desired. So, I use self raising flour along with a small pinch of baking powder. My cakes are always taller, fluffier and lighter when I use both. Although, be careful not to add too much as this will actually cause the cake to sink. A small pinch is more than enough and makes a big difference.
7. Always Sieve Your Dry Ingredients Together
This ensures there are no lumps and is a good way to mix the ingredients together evenly. Try to sieve your ingredients from a height to capture extra air in the mixture.
8. Add Milk To Your Cake For Extra Moistness
I like to add milk to my cakes (full fat for extra creaminess!) and there’s a particular way that you should combine your wet and dry ingredients that I’ll explain in the next step.
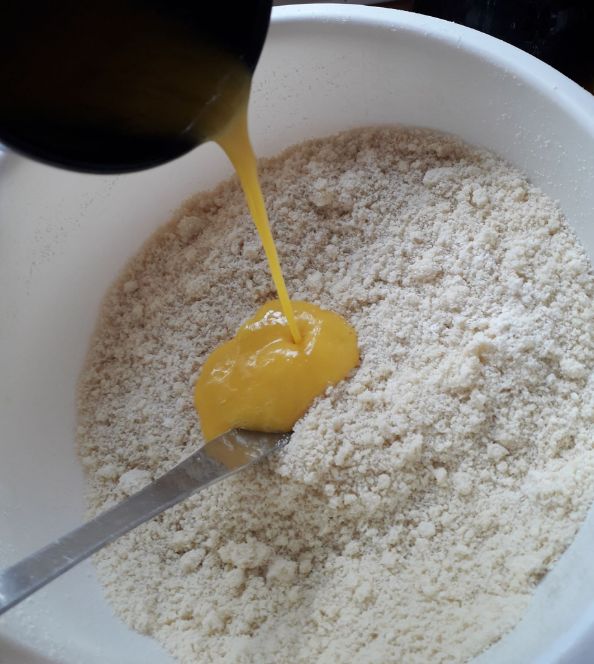
9. The Flour-Liquid Method
This is when you add most of the flour to the creamed butter and sugar, then add the milk, then the rest of the flour. This is all about lessening the gluten production in the flour. If you’d like a more in depth description on this process, this page does a great job at explaining it.
10. Don't Overmix
Gluten is the enemy when making cakes. When you work flour, it produces gluten. If you overmix your cakes once you’ve added the flour, it will create a dense, tough texture. So, once you’ve added the flour, only mix enough that is necessary for it to become combined and smooth.
11. Give Your Cake A Few Taps On The Counter Before Putting It In The Oven
This tip I only learned recently, but it’s made a big difference to my cakes lately. If you give your cake tin a firm few taps on the counter before putting it in the oven it helps to pop any large air bubbles. This gives your cake a more well-rounded stable rise.
12. Cooking Times Can Vary
13. Don't Open The Oven Too Early
Or it’ll make your cake sink. We’ve all heard this one, and it’s true. Letting a big rush of cold air into the oven while your cake is at crucial rising stages is detrimental. It halts any reactions taking place to make the cake rise, and to be honest, there’s not much you can do to come back from it. So if you can’t open the door and don’t have a modern oven which has a light so you can see your cake… what’s the best way to tell if a cake is ready?
14. You Can Always Smell When A Cake Is Ready
This is the best piece of baking advice my nan gave to me. She was a pro cake maker and always baking. I always wondered how she could tell when a cake was ready without even looking at it. Then she said, “it’s because I can smell it!” and she was always right. When baking a cake – if you can’t smell it, chances are it’s not done. Once that glorious smell fills the house, that’s the best sign that your cake is ready.
15. Dry Cake? Add Sugar Syrup
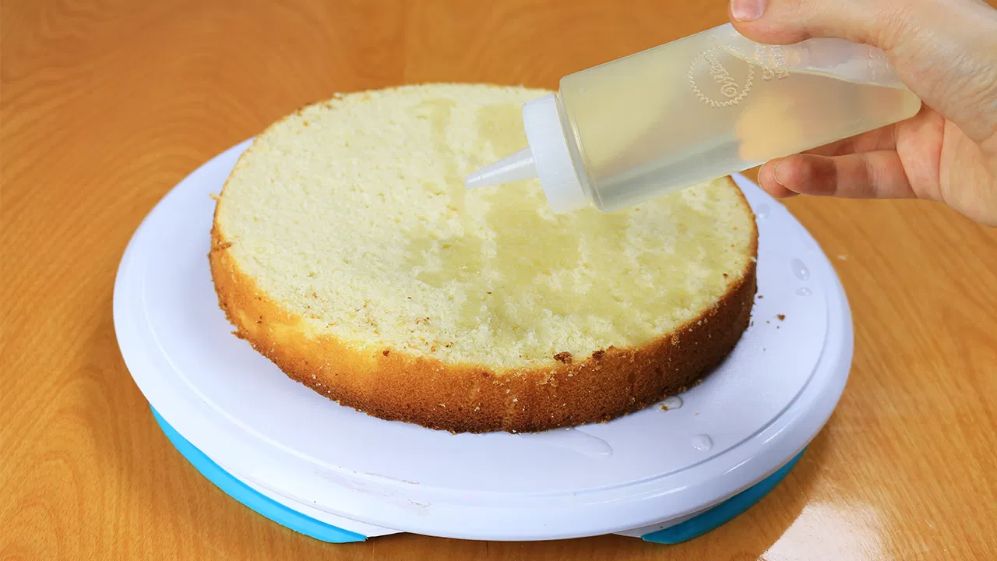
We’ve all been in the situation when we’ve forgotten about our cakes and they’ve been in the oven a bit too long. What you end up with is a dry, crumbly cake. But that doesn’t mean it can’t be salvaged! A sugar syrup is a simple 1:1 ratio of sugar and water. Simply boil the mixture gently in a saucepan for 1-2 minutes or until the sugar has dissolved. Drizzle the sugar syrup on your cakes (it helps to use a squeezy bottle) and voila! Your cake is moist and moreish again.
Bonus tip: Cake strips -they are my new must-have in the kitchen! They are adjustable cloth strips (you can even get ones with all different patterns on if you fancy) which you dampen in water, then wrap around your cake. It then creates a extra barrier between the cake and the fiercely hot oven temperature. This keeps the cake fluffy and moist all the way through and stops it from getting crispy caramelised edges. It also gives you perfectly flat cake layers perfect for stacking – no more cutting off the rounded top of your cake! The fact that it’s adjustable means you can use it for any size of cake. Get them here! If you don’t want to buy them, you can also make your own for a fraction of the price. Just dampen some kitchen roll and then wrap it into a long strip that will fit around your cake tin – it works just as well!
Now, you may be thinking that this all sounds a bit of a faff. But I promise that if you encorporate these tips and tricks into your cake making process that your cakes will thank you for it. Once you learn the science behind why cakes are made the way they are, it makes more sense as to why recipes can seem so specific in their steps and methods. I hope you found these 15 tips on how to make a perfect cake helpful!